


Subscribe To
Friday, October 5, 2012
Dracula Book Sculpture

DRACULA - For all my blood-thirsty followers here is another book sculpture of Dracula. I had so many special requests lately that it has been hard to stock my shop. Finally, I was able to complete one for the shop. Hopefully I will be able to complete three more book sculptures by next Wednesday.
Doing this one, has put me in the mood for full-moon, foggy nights with bat filled skies. Halloween is right around the corner. After that, things get a little hectic. I think I will make the time to enjoy the beautiful fall weather. Maybe I’ll set up a cutting table outside and try sculpting in the woods.
http://www.etsy.com/shop/artfuliving
http://www.etsy.com/shop/artfuliving
Monday, September 17, 2012
Stuart Little

Stuart Little
I just completed a special order: Stuart Little. I like doing books sculptured from this book. Next Don Quixote!! Then 2 more special orders: Little House and Dracula.
Tuesday, September 11, 2012
Lord of The rings - Two Towers

Lord of The Rings - Two Towers
It looks like I will be doing a lot of The Lord Of The Rings Book Sculptures this fall. This is the first.
Sunday, September 2, 2012
Goblins Ate My Book...Again


Goblins Ate My Book...AGAIN!
Just finished my newest Book Sculpture: Goblins Ate My Book...AGAIN! I did something different with this one. I made the illustrations more interactive with the book pages by having the little devils actually eating and tearing the pages. Major fun!
https://www.etsy.com/listing/108434931
Tuesday, August 28, 2012
Guliver's Travels

Gulliver's Travels
I tried something different with this sculpture. Since the front cover of this late 1800s book is so ornate, I decided not to hide it. I can't believe how well, my sculptures have been selling lately. I can't seem to keep a good stock in my shop. At this time, I am working on Goblins Ate My Book II, Hobbit, LOTR, Peter Pan, Dracula, and more. Hopefully I can get a new book listed every other day or so.
https://www.etsy.com/listing/108006378
Saturday, August 25, 2012
Little House on The Prairie


Little House On The Prairie
I just finished Little House on The Prairie. On Deck is Pied Piper. Then Goblins Ate My Book, Dracula, Peter Pan, Gulliver's Travel, and more. It looks like September is going to be a busy month!
https://www.etsy.com/listing/107786805
Thursday, August 23, 2012

Flyin High - Steampunk 3D Paper Sculpture

Flyin High
This is the first in my new series of steampunk 3D paper sculptures. All will be limited edition and shadowbox framed. Available in my Etsy Store: https://www.etsy.com/listing/107321576/flyin-high-steampunk-3d-collage-paper
Tuesday, July 10, 2012

Monday, July 9, 2012

Wednesday, July 4, 2012

Creamy Celery Bacon Soup
This weeks Bountiful Baskets had great stalks of celery. Since I don't like Mangos, I traded my mangos for someone's celery. Of course, I hate anything going to waste so I am trying new things. This is what I came up with.
3 strips of bacon
¼ cup onions - diced¼ cup bell pepper – diced
3 cups sliced celery
4 cups chicken broth
2 cups milk or half & half
3 Tbsp flour
¼ milk
Add to taste – salt, pepper, granulated garlic, celery seed, sage
1. Put chicken broth
on to boil while cooking bacon until crisp.
When broth comes to a boil, turn
heat to simmer. When bacon is crisp, remove from skillet unto
a paper towel.
2. To skillet, add onion and bell pepper and saute for about
one minute, then add celery. Continue to saute for another 3 minutes.
3. Pour all contents of skillet and bacon (crumbled) into simmering broth (to reduce fat, drain off
bacon grease before adding to broth).
4. Turn up heat to medium high and add milk/half&half and seasonings. Because some brands of
bacon is saltier than others, be sure to taste before and after adding spices until you get the taste
you desire.
5. In a small bowl stir together flour and ¼ cup of milk until smooth. Add to soup and stir. Bring to
almost a boil and remove from heat.
6. You can garnish with a sprinkle of cheese, homemade sour dough croutons, and bacon bits.
Please note that with all my recipes, amounts are adjustable. Such as; more flours makes the soup thick, while less makes it thinner; more broth less milk makes it soupier, while less broth more milk makes it creamier; more celery makes it more chunkier; ham instead of bacon, red bell peppers instead of green bell peppers and so on. Have fun and make it your own!
This is a quick and easy soup and I was surprised that I was able to please everyone! My youngest son is super picky about having to eat veggies. I prepared his bowl by straining out all the chunky parts and topped it off with a bit of cheese and a few sourdough croutons. He loved it and actually wanted more! Wow, this is a soup I will make more often.
Serves 4

Mexican Squash Over Angel Hair Pasta
This week I purchased the Veggie Pack - Mexican from Bountiful Baskets. I have never had Mexican squash before and I was anxious to try it. This is what I came up with.
2 Mexican Squash - 1" dice
1/4 cup diced onions
1/4 cup diced bell pepper
6 cherry tomatoes - sliced in two
2 Tbsp Olive oil
1 clove minced garlic
Salt & Pepper to taste
Basil (fresh or dried) to taste
4 servings Prepared Angel Hair Pasta
1. Prepare angel hair pasta. Add a bit of olive oil and basil after it has been cooked and drained.
2. Add olive oil to a medium high skillet. Add onions, bell pepper and saute' briefly before adding squash, tomatoes and garlic. Add Salt, pepper, and basil. Saute until tender.
3. Serve squash mixture over pasta and garnish with grated Parmesan cheese. Bread sticks or homemade sourdough croutons go great with this dish.
"This dish is so summer fresh tasting and great for a light dinner after a hot afternoon."
Serves 2 large servings or 4 light servings.
Saturday, April 7, 2012


Monday, April 2, 2012
The Wind in the Willows - My newest book sculpture

Saturday, March 24, 2012
Pecan Pie Mini Muffins
The other day, a friend of ours stopped by for an afternoon visit. Well, if you know me, I have to cook something for my guests. I had been wanting to make these muffins all week, but I knew if I did, Bob and I would eat them ALL. They are addicting!! So, Doug saved us! We had enough to have a little endulgence and plenty left over for Doug to take home to Holly.
These little muffins are so quick and easy to make, that if I have the ingredients in the cupboard, I'm in danger of eating way too many of these.

Pecan Pie Mini Muffins
MUFFINS
1/2 cup flour
1 cup packed brown sugar
3/4 cup melted butter
2 beaten eggs
1 cup chopped pecans
Dash of salt
1/8 tsp vanilla
FROSTING
1 8oz block of cream cheese (room temperature)
2 Tbs milk or cream
2/3 powdered sugar
1/8 tsp Vanilla
Directions
Muffins1. Preheat oven to 350°. Line mini muffin pans with mini muffin liners.
2. In a large bowl, combine the flour, brown sugar, and pecans. In a smaller bowl, combine melted butter and eggs. Pour butter egg mixture into flour mixture and stir until blended.


3. Fill mini muffin cups 2/3 full (about a heaping tablespoon). Bake at 350° for 20 to 25 minutes or until an inserted toothpick comes out clean. Remove muffins from pan to wire racks to cool.


Frosting
4. With an electric mixer blend together cream cheese, milk/cream, powdered sugar, vanilla, until smooth. Chill for 10 minutes.
5. Top each muffin with a dollop of frosting. For a fancier look, use a pastry bag with a star tip to frost muffins.
Serving suggestions: Top frosted muffins with a sprinkle of chopped pecans, or crumbled crisp bacon.

Sunday, March 18, 2012
Sinfully Easy Eclairs
I have always had a LOVE for eclairs, but have never had the time to make them from scratch. I have tried many 'shortcut' type recipes, but nothing that thrilled me... until now.
After many trys I have decided that there is no shortcut to a great pastry. As for the filling and chocolate topping, I have come up a few quick and easy shortcuts that still give the eclairs the wonderful, rich flavors I remember experiencing as a child.
The pastry may take a little time and patience, but trust me, it is well worth the effort.

CHOUX Pastry:
1 cup Water
1/2 cup Butter (real butter)
1 cup Flour
1/4 tsp Salt
4 Eggs
Preheat oven to 450 degrees. Lightly grease a large cookie sheet.
In a medium sauce pan bring water to a boil, add butter and stir until butter is melted. Reduce heat to low and stir in flour until it forms a dough ball. Remove from heat. Working quickly, add one egg at a time, mixing quickly so that the eggs do not cook. Continue until all eggs are mixed in.
Spoon dough into pastry bag. Pipe dough into lightly greased cookie sheet into 12 strips of 1 1/2" x 3" about 2" about.
Bake at 450 degrees for 15 minutes. Reduce Oven to 325 degrees and bake for an additional 20 minutes until golden brown. Working quickly, remove from oven and with a wooden spoon handle pierce a hole along the center, almost to the other side, but not all the way through. Set aside and allow to cool completely.


FILLING:
1 box of Instant Vanilla Pudding Mix
1 cup Heavy Whipping Cream
1 cup Milk
1/4 tsp Vanilla Extract
With electric mixer mix together, pudding mix, cream, milk, and vanilla until smooth and thick. Spoon filling into pastry bag with a medium to large size tip. Close and refrigerate for 15 minutes.
CHOCOLATE TOPPING:
1 tub Ready Made Milk Choclate Frosting
1/4 cup Heavy Whipping Cream
With electric mixer, mix together frosting and cream until smooth. Spoon into pastry bag with a medium or large star tip. Set aside until ready to use.
Time to fill the pastries. With pudding filled pastry bag, insert tip into each pastry and squeeze. If you hold the pastry gently, you can usually fell when the filling has reached the end. Repeat until all pastries are filled. Arrange onto serving platter and creatively top with chocolate frosting. Refrigerate until ready to serve. Store leftovers (if there are any) in refrigerater in a sealed container. Can be stored up to 3 days. NOTE: If you are wanting to pre-prepare these for an event. Make the pastries and store in an airtight container in the refrigerater. The pudding and frosting can also be pre-prepared and stored in the refrigerater for up to 4 days. Simply assemble when ready.

After many trys I have decided that there is no shortcut to a great pastry. As for the filling and chocolate topping, I have come up a few quick and easy shortcuts that still give the eclairs the wonderful, rich flavors I remember experiencing as a child.
The pastry may take a little time and patience, but trust me, it is well worth the effort.

Sinful Eclairs
CHOUX Pastry:
1 cup Water
1/2 cup Butter (real butter)
1 cup Flour
1/4 tsp Salt
4 Eggs
Preheat oven to 450 degrees. Lightly grease a large cookie sheet.
In a medium sauce pan bring water to a boil, add butter and stir until butter is melted. Reduce heat to low and stir in flour until it forms a dough ball. Remove from heat. Working quickly, add one egg at a time, mixing quickly so that the eggs do not cook. Continue until all eggs are mixed in.
Spoon dough into pastry bag. Pipe dough into lightly greased cookie sheet into 12 strips of 1 1/2" x 3" about 2" about.
Bake at 450 degrees for 15 minutes. Reduce Oven to 325 degrees and bake for an additional 20 minutes until golden brown. Working quickly, remove from oven and with a wooden spoon handle pierce a hole along the center, almost to the other side, but not all the way through. Set aside and allow to cool completely.


1 box of Instant Vanilla Pudding Mix
1 cup Heavy Whipping Cream
1 cup Milk
1/4 tsp Vanilla Extract
With electric mixer mix together, pudding mix, cream, milk, and vanilla until smooth and thick. Spoon filling into pastry bag with a medium to large size tip. Close and refrigerate for 15 minutes.
CHOCOLATE TOPPING:
1 tub Ready Made Milk Choclate Frosting
1/4 cup Heavy Whipping Cream
With electric mixer, mix together frosting and cream until smooth. Spoon into pastry bag with a medium or large star tip. Set aside until ready to use.
Time to fill the pastries. With pudding filled pastry bag, insert tip into each pastry and squeeze. If you hold the pastry gently, you can usually fell when the filling has reached the end. Repeat until all pastries are filled. Arrange onto serving platter and creatively top with chocolate frosting. Refrigerate until ready to serve. Store leftovers (if there are any) in refrigerater in a sealed container. Can be stored up to 3 days. NOTE: If you are wanting to pre-prepare these for an event. Make the pastries and store in an airtight container in the refrigerater. The pudding and frosting can also be pre-prepared and stored in the refrigerater for up to 4 days. Simply assemble when ready.

Saturday, March 10, 2012
Pull-Apart Pizza

Pull-Apart Pizza
2 Containers Pillsbury Refridgerated Biscuit Dough
1 Jar Pizza Sauce ( I acutually used some of my homemade pasta sauce)
1 Cup Pepperoni/Sausage/or any other favorite Pizza Topping (I use 1/2 Chorizo, 1/2 Turkey Sausage)
1 Cup Diced Mixed Veggies (such as onions, bell peppers, mushrooms, Olives and such)
1 tsp Italian Seasoning (or fresh herbs if you have them)
1/4 tsp Garlic Powder
2 Cups Shredded Mozzarella Cheese
Preheat oven to 400 degrees. Coat 9x13 baking dish/pan with oil or cooking spray.
Cut each biscuit dough into 4 pieces and place into large mixing bowl. Add pizza sauce, meat, veggies, seasonings, and cheese (reserve a bit of cheese for topping). Fold together gently until combined.
Pour mixture into greased baking dish. Bake at 400 degrees for approximately 20 to 30 minutes depending on the style of biscuits you used (I used the smaller biscuit style instead of the Grands style). Check for doneness by pulling up on one of the biscuit pieces to make sure the inside dough is cooked through. If your dough is having a tough time getting cooked through, don't be afraid to give it a stir. Once done, remove from oven, sprinkle with remaining cheese. Let set for 5 minutes before serving.
Tuesday, March 6, 2012
Mini Twice Baked Taters

Mini Twice Bake Taters
10 - 12 Butter Gold Potatoes (or any small size variety)
Olive oil
1/2 cup shredder Parmesan cheese
1/4 cup butter
1/4 cup sour cream (room temp)
1/4 cup cream cheese
3 Tbs chopped green onions
3 strips crispy bacon (6 if you have bacon thieves)
Salt
Pepper
Garlic powder

 Wash, dry, then coat each potato with olive oil. Bake at 400 degrees until tender (approx 20 to 30 minutes). Remove from oven and let set for 10 minutes.
 Cut each potato in half. Using small spoon, scoop out center portion of potato halves and place in bowl. Be careful to leave enough potato on skin to give enough support so that they stand on their own. Arrange skins on baking sheet, sprinkle with salt, pepper, and shredded Parmesan cheese. Return to oven at 400 degrees for approx 20 to 30 minutes to desired crispiness. Remove from oven and set aside.
Mash the reserve potato centers with fork. Add butter, sour cream, cream cheese, green onions, salt, pepper, garlic powder. Mix well. Spoon mashed potatoes into potato skins and top with bacon crumbles. Return to oven for 10 minutes. Serve hot!
Monday, March 5, 2012


Thursday, March 1, 2012
Mayberry's Insects - Custom order book sculpture

Custom Order: Mayberry's Insects
Custom order, almost complete. I still need to spary on the paper preservative and, once dry, place it in the shadow box. This one was more fun than I thought it would be.
My lastest book sculpture: Moby Dick

My Lastest Book Sculpture: Moby Dick
Donated to the Mabee-Gerrer Museum of Art "Off The Wall" Benefit.
Monday, February 27, 2012
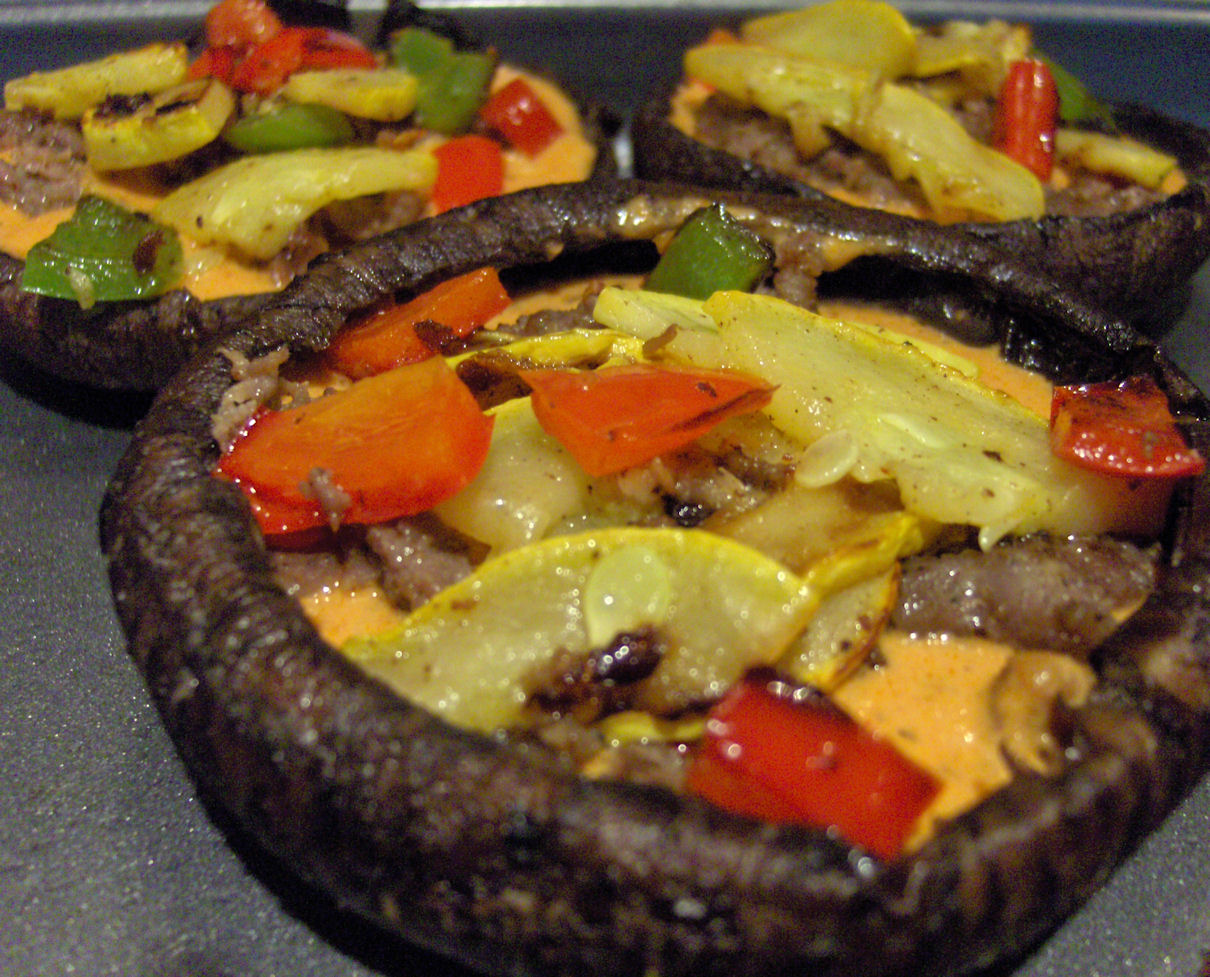
Crustless Portobello Pizzas

Crustless Portobello Pizzas
4
to 6 Portobello Mushrooms (cleaned with stem and gills removed)
4
Tbsp Olive Oil1 tsp Minced Garlic
Salt to taste
½ lbs Spice Italian Sausage (browned & drained)
2 Tbsp Olive Oil
1 cup Assorted diced veggies (I used Red Bell Pepper, Bell Pepper, Squash)
½ tsp Mince Garlic
½ cup Pasta Sauce (I used my homemade sauce)
½ cup Heavy Whipping Cream (half & half or yogurt can be substituted)
½ cup grated Parmigiano (or grated parmesan)
2 cups Mozzarella
6 Cherry Tomatoes (sliced)
2 tsp chopped Fresh Basil (chopped)
 Mix
1 tablespoon minced garlic in 2 Tablespoons olive oil. Rub mushroom caps gentle
with seasoned oil. Arrange caps on
cookie sheet and bake at 350 degrees for 15 to 20 minutes until tender. Remove from oven and set aside.
Mix
1 tablespoon minced garlic in 2 Tablespoons olive oil. Rub mushroom caps gentle
with seasoned oil. Arrange caps on
cookie sheet and bake at 350 degrees for 15 to 20 minutes until tender. Remove from oven and set aside.
In
a large skillet add 2 tablespoons olive oil and diced vegetables. Sauté for 3
minutes, then add ½ teaspoon minced garlic and sauté another 2 minutes. Remove
cooked vegetables from skillet and set aside.
 In
same skillet add Cream, pasta sauce, and grated parmigiano. Heat to a simmer
and remove from heat.
In
same skillet add Cream, pasta sauce, and grated parmigiano. Heat to a simmer
and remove from heat.
Layer sausage,
vegetables, cheese and top with fresh basil and tomato slices.
Bake
at 350 degrees for 20 to 30 minutes until cheese is completely melted. Serving size is One Portobello.
Serve while hot - ENJOY!


Please note: I only prepare 3 servings and reserved the remaining
sausage, sauce, and veggies for omlettes the next morning.
Friday, February 24, 2012
My New Creation: Fairytale Book Sculpture

 Well, I was able to set aside a few hours each day for the last two weeks to complete (nearly complete) a project. My husband Bob, loves collecting old books - lots of old books. Many of them are in very bad condition, but too unique to toss out. So, I have reworked one into a 'book sculpture'. All though tedious, it has been a lot of fun.
  Bob, is going to sculpt me a tree branch holder out of stoneware clay. Now I have to wait two weeks for the clay to dry and for him to fire, glaze, and fire again. I love his sculptures, but I don't have it in me to wait patiently. I guess that's why I create things that can be completed quickly. In the meantime, I will start my next book sculpture.
SOLD - April 2nd, 2012 on Etsy.com (artfuliving.etsy.com)
Impulsive Tomato Soup
During my last shopping trip, I accidentally purchased 2 bottles of 'Low Sodium' V8 Vegetable Juice. I honestly have tried to cut back on my sodium intake, but my stubborn tongue enjoys the flavor of salt. I thought I could simply sprinkle in a healthy dose of salt and it would restore my favorite morning drink. Oh, but to no avail. One sip and I knew that I would not be drinking my morning V8!
Earlier this week, I made a batch of salsa and then a batch of tomato sauce. Once all my organic tomatoes were all used up, I got in the mood for a pot of homemade tomato soup. I kicked myself for not saving back a few tomatoes. While looking for something else to warm my tummy, I saw a lonely bottle of 'Low Sodium' V8 sitting in the back of my pantry. So my creative juices began to stir.

Impulsive Tomato Soup
1 46 fl oz Bottle of V8 Low Sodium 100% Vegetable Juice
1/2 cup milk
1 can Campbell's Cream of Celery Soup
Salt
Italian herbs
Pepper
Garlic Powder
Tabasco Sauce (just a few drops)
GARNISH: Cheddar Cheese and Croutons
In a pot add milk and celery soup and stir till smooth. Add Vegetable juice and spices. When it comes to spices, I add to taste. that means, I add a little, taste a little, add a little more, until its perfect. Since every ones tastes are a little different, I did not list measurements. Heat on medium heat until simmering. Add Tabasco sauce. Lower heat to low and simmer for 10 minutes. Garnish and serve.
Substitutions: I think any condensed cream soup will work. If I had had Campbell's Nacho cheese soup, I would have use that and instead of Italian herbs, used chili powder. Maybe next time!
Thursday, February 23, 2012
Quick & Easy Veggie Lasagna

Quick & Easy Veggie Lasagna
¼ cup Olive Oil
½ cup Diced Onions1 cup diced Bell Pepper (I use a combination of both red & bell pepper)
1 cup sliced mushrooms (optional)
2 Tbs Minced Garlic
½ cup sliced zucchini
½ cup yellow squash
2 cups chopped fresh Spinach
1 Tbs Italian herbs
Salt to taste
2 ½ cups Tomato sauce (I used my homemade sauce that I had
in the freezer)
1 box Oven Ready Lasagna Noodles2 cups Mozzarella Cheese
1 ½ cup Ricotta Cheese (or cottage cheese if desired)


Preheat oven to 350 degrees. In a large skillet, heat olive
oil over medium high heat. Add onions and sauté for 3 minutes. Then add bell
pepper, mushrooms, garlic, herb, spinach and salt . Sauté till tender. Stir in tomato sauce and set aside.


Lightly spray an 8x8 baking dish/pan with a non-stick spray. Spread a layer of veggie-sauce; layer two
pieces of oven-ready pasta over the sauce; Spread Ricotta cheese over pasta (I
like to put my ricotta in a pastry bag or a Ziploc baggie with corner cut out
and squeeze my ricotta into place). Next, Spread a layer of veggie-sauce and
sprinkle with mozzarella cheese and add another layer of pasta. Repeat two more
times ending with veggie-sauce and cheese on top.
Cover with foil and bake at 350 for 30 minutes. Remove foil
and bake an additional 10 minutes until cheese is hot and bubbly. Remove from oven and let set of 5 minutes
before cutting.

Subscribe to:
Comments (Atom)